# Quick Introduction
TIP
This guide is a quick starter. After going through this guide, you will be able to define models, access data through your models, subscribe to real-time data and create and update data. We will use a simple todo app as an example. A working demo of what we're going to build can be found here: Demo
Before you start, you probably want to create a new Firebase project in the
Firebase console. Also, go to Database
and create a new Realtime Database with "Start in production mode" security rules. before you start please consult the configuration guide
in order to setup heliosRX and Firebase.
# Step 1: Create a Model
First, let's create a new model in src/models/task/ for tasks:
mkdir -p src/models/task
touch src/models/task/schema.js
touch src/models/task/index.js
The model has three fields. A title, a creation date createdAt and a flag
isDone that indicates whether the task is finished or not. Let's create a
model definition first:
// file: src/models/task/schema.js
export default {
  fields: {
    title:     { type: 'String', required: true },
    createdAt: { type: 'ServerTimestamp' },
    isDone:    { type: 'Boolean' },
  },
};
and
// file: src/models/task/index.js
import schema from './schema'

export default {
  schema: schema,
};
This defines a model with a required field title and two optional fields.
Next, we create a GenericStore, which gives us access to data stored in
realtime database through a object-oriented interface. A GenericStore serves
as a factory class, that will spawn model instances and lists of model models
instances. More on that later. First, edit src/models/config.js like this:
// file: src/models/config.js
import heliosrx from 'heliosrx'
import taskModelDefinition from './task';

export const task = new heliosrx.GenericStore(
  '/tasks/*',
  taskModelDefinition
);
We also define here, where the data is stored in realtime database. As you can
see GenericStore takes two arguments. The first argument is the location of
the data (see path syntax). The
second argument is a model definition, which we just created.
* is a placeholder for the (unique) id of the object. Once we have written
data to realtime database it should correspond to something like this:
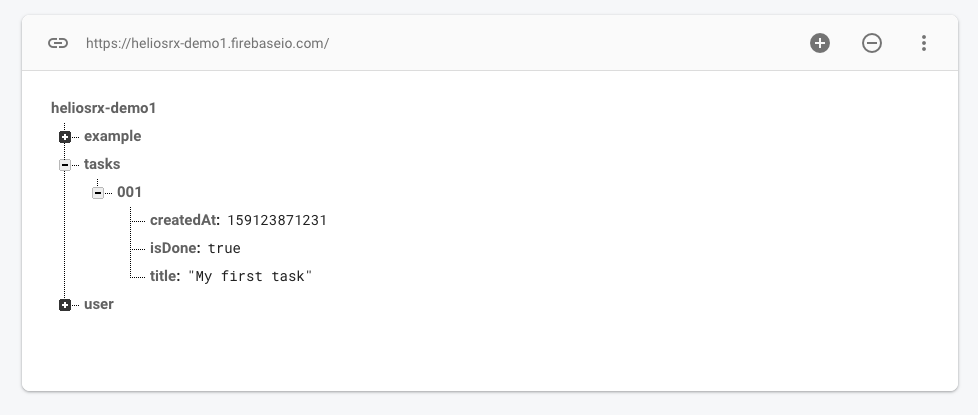
Next, we create a security rule db/rules/rules.bolt that allow everybody read and write access to the path:
// file: db/rules/rules.bolt
path /tasks is Task[] {
  read() { true }
  write() { true }
}
Security tip
This should later be replaced with somthing like
path /tasks is Task[] {
  read() { isSignedIn() }
  write() { isSignedIn() }
}
otherwise the whole internet can read and write to your project. Probably not want you want.
If you're not familiar with this, this is the bolt syntax.
heliosRX automatically generates bolt files, which are compiled to security rules
using the bolt-compiler. Learn more here.
Now let's also add a create function, which (if present) will set default values,
when a new instance of this model is created:
// file: src/models/task/schema.js
import { moment } from 'heliosrx' // This is a enhanced version of moment-js

export default {
  create({ title }) {
    return {
      title:     title || "Undefined title",
      createdAt: moment.currentTimeServer('REALTIMEDB'),
      isDone:    false,
    };
  },
  // --- see above
  fields: {
    title:     { type: 'String', required: true },
    createdAt: { type: 'ServerTimestamp' },
    isDone:    { type: 'Boolean' },
  },
};
title is a required field and should therefor be passed to the create function.
If we forget to provide it when creating a new task instance, we'll get an error.
moment.currentTimeServer is a helper function that creates a special field,
which will be replaced with the current timestamp on the server.
Next, we generate and deploy the security rules. heliosRX will automatically
generate a .bolt file for every model and merge it with rules.bolt into
/database.bolt which is then compiled to /database.json.
helios rules --write database.rules.bolt
firebase-bolt database.rules.bolt
firebase deploy --only database
Now we're ready to read and write data to the firebase realtime database.
TIP
You might want to add a few aliases to your package.json
"scripts": {
  ...
  "rules:make":   "helios rules --write database.rules.bolt && firebase-bolt database.rules.bolt"
  "rules:deploy": "firebase deploy --only database",
},
# Step 2: Subscribe to data
Create a new .vue component anywhere you want. Let's have a look at how we
can use the model to fetch data or subscribe to data (keep data synced, when
it changes on the server). First, let's look at an example, where we are
syncing all data in /tasks/* as a list of GenericModels:
// file: src/components/Demo1.vue
<template>
  <pre>{{tasks}}</pre>
</template>

<script>
export default {
  computed: {
    tasks() {
      return this.$models.task.subscribeList();
    }
  },
}
</script>
Easy right? Let's actually make it a little bit more realistic by looping through the list of model instances:
<template>
  <ul>
    <li v-for="task in tasks.itemsAsArray()" :key="task.$key">
      {{task.title}}
    </li>
  </ul>
</template>
heliosRX provides a auto-generate $key which can be used with v-for loops.
Also GenericList's provide helper functions for sorting and filtering lists,
see api/generic-list.
TIP
A $key is automatically generated for each model instance.
If we just want to sync a single node, like /tasks/-Lw_jEwrxiM6d2fS0n2m we can use
subscribeNode instead.
<template>
  <pre v-if="task.$ready">{{task}}</pre>
</template>

<script>
let taskId = '-Lw_jEwrxiM6d2fS0n2m';

export default {
  computed: {
    task() {
      return this.$models.task.subscribeNode(taskId);
    }
  },
}
</script>
This will automatically re-render the template if the data changes on the server.
GenricList and GenericModel are fully reactive. Another reactive
"magic property" that GenericModel provides is $ready which will become
true as soon as the data is loaded and then pushed to the local state.
If you're not interested in subsequent updates and only want to fetch the data
once, you can use fetchList and fetchNode with the exact same syntax.
# Step 3: Write data
Ok, we now know how to subscribe to data and render it, in other words how information flows from the server to the client. Next, we have a look at how data flows in the opposite direction.
First, let's create a new task. The easiest way to do so is by calling the add
method of the GenericStore.
<template>
  <div>
    <pre>{{tasks}}</pre>
    <button @click="addItem">Add Item</button>
    <button @click="updateItem">Update Item</button>
  </div>
</template>

<script>
export default {
  // ...
  methods: {
    addItem() {
      this.$models.task.add({ title: "Foobar" });
    },
    updateItem() {
      // The first argument of update is always the id
      this.$models.task.update( "-Lw_jEwrxiM6d2fS0n2m", { title: 'New title' });
    }
  }
}
</script>
This will in fact call our create function that we defined in the model and
then write it to the database.
TIP
Firebase (and heliosRX) will update the local state in the client. This means that the template will update and show the new data. However, if the data can not be written, for example, because the client does not have permission. Firebase will trigger a second local state update which basically reverses the initial change.
This means you usually don't have to worry about managing your view during a write process.
There are also a two factory methods, which can create a new GenericModel:
new()- Create empty model from schema (without calling create function)newFromTemplate( data )- Create empty model using create function
<template>
  <div>
    <pre>{{tasks}}</pre>
    <button @click="addItem">Add Item</button>
  </div>
</template>

<script>
export default {
  methods: {
    addItem() {
      let task = this.$models.task.newFromTemplate({ title: "Foobar" })
      task.title = 'My updated title';
      task.isDone = true;

      task.write();
    }
  }
}
</script>
This is especially useful, when the component has a modal / form characteristics. Also heliosRX will provide client-side validation:
<template>
  <div>
    <pre>{{tasks}}</pre>
    <input v-model="task.title" /> <!-- will automatically sync to the task -->
    <button @click="addItem">Add Item</button>
  </div>
</template>

<script>
export default {
  created() {
    // Create empty task when component is created
    this.task = this.$models.add.newFromTemplate({ title: "Foobar" });
  }
  methods: {
    addItem() {
      // Check if all task fields have valid values
      if ( this.task.$isValid ) {
        // Write task to db ()
        this.task.write();
      } else {
        // Handle invalid user input
      }
    }
  }
}
</script>
This is all it takes to write a real-time web applications with heliosRX!
# A few more things
- Almost all "write" methods in heliosRX will return a promise. Usually the
first argument is the
idof the (newly created) object
this.$models.task.add().then(id => {
  console.log(`task with id ${id} created`);
});
- "read" methods don't return a promise because they already return a reactive
model instead, but
GenericModelandGenericListwill provide a promise, that resolves as soon as all data is ready as the$promiseproperty:
let ex = this.$models.example.subscribeList();
ex.$promise.then(() => {
  console.log("'ex' is ready");
})
heliosRX supports different validation methods, which can be configured. By default, validations are derived from the data type, but additional validation rules can be configured (e.g. "string must not exceed 30 characters").
heliosRX automatically convert all data types containing
"Timestamp"to moment objects, also whenever a field is set to a moment object it will automatically convert it to a timestamp. This makes dealing with timestamps very convenient compared to standard firebase.In development mode, you can access
$modelsand$apiin the console. This gives you a pretty powerful tool to change data from your browser.GenericModel's provide many other useful "magic properties", such as$dirtyfor all fields that have been changed by the user or$noaccess, which will be set totrueif the client does not have access to the requested data.heliosRX does NOT automatically infer local validation rules from firebase server validation rules, however, both client and server rules can be defined in ONE PLACE, which makes it very easy to ensure consistency between server and client.
One of the strengths of heliosRX is dealing with nested data. We didn't cover that here. Imagine your data is structured like this:
/project/{projectId}/user/{userId}/task/{taskId}
heliosRX provides a straight forward API to deal with this. Keep on reading if you want to learn more.